Thursday 29 December 2011

Buckwheat & Oats

The little young man and I had a very long baking session which lasted for 5 hours. We made cupcakes (as usual!), buckwheat crackers and oat crunchies.

We made lemon and orange cupcakes.
The moment it was warm, the little young man helped himself to them!

Here's the recipe for the lemon cupcakes. If you can tolerate lemons and oranges, (I can't. I bake them for my family.) these cupcakes are yummy to the tummy!

Cupcakes recipe

Buckwheat crackers

Ingredients:

1. Buckwheat flour (200g)
2. High protein unbleached bread flour (400g)
3. 1/2 teaspoon of sea-salt
4. 1/2 cup of cold water

----------------------------------------
1. Pour the sieved flours into a large bowl.

2. Add the salt.

3. Add the cold water and knead till smooth.

4. Break the dough up into about 7 small balls.

5. On an aluminium foil, place a small ball of dough on it.

6. Add some flour over the balls and roll them flat with a rolling pin.

7. Pre-cut the crackers before baking them.

8. Bake at 190C for about 30 minutes or until crispy.

9. Once the crackers are cool, break them into pieces.

All lined-up, waiting to go into the oven.

Crispy buckwheat crackers


Oat Crunchies

Ingredients:

1. Organic rolled oats and baby rolled oats (500g)
2. Brown sugar (1/4 cups)
3. Sunflower oil (1/4 cups)
4. 2 eggs

------------------

1. Pour oats, brown sugar, eggs and sunflower oil into large bowl.

2. Mix all ingredients until equally blended.

3. Spoon into tiny paper cups.

4. Bake at 200C for 20 minutes.

5. Serve once they are cool. You can refrigerate the rest in an airtight container.

Before baking
Rows of freshly baked oat crunchies


Wednesday 28 December 2011

The Creatures in the Container Garden (Part 2)

White Marked Tussock Moth Caterpillars

I got rid of this plant (I have no idea what it is called) and the caterpillars. Apparently touching the hairs of these caterpillars will set off an allergic reaction. With me being so sensitive and having had anaphylactic shocks before, it is better and wiser to get rid of them!

Squash Bugs!


Fruit Fly


Cucumber Bug


Cycad Blue Butterfly (Chilades pandava pandava)


Purple Hairstreak Butterfly
Dragonfly


Tuesday 27 December 2011

The Perseverance of a Lifetime

These six weeks have been the the most fully utilized holiday that I have had since the anaphylaxis attack 33 months ago which had totally changed my life 180 degrees.

What did I do, you asked? I did what I have been doing all these 33 months which is fighting the good fight of IA. The difference? I went ahead and walked in the disgustingly smelly, gooey and slippery mud. Though I have been trudging in the mire all this while, this round I made sure I wore boots that were knee-high and a mud-proof coat and I walked through the mud unsullied. And I walked on. On and on and on and on. Of course I had mud slung onto parts of my face that were exposed. But this time, I protected my eyes with goggles. My head with a cap. And my face with masks. Tons of masks. 

And what did I do during these 6 weeks? I went out! I met up with friends whom I have not seen in a decade. I practiced driving in the blinding storm to my son's new school. I made sure I got used to driving in all sorts of weather and at all sorts of time of the day. I made new types of food that I have not eaten in these 33 months. I started adjusting my waking up times to be earlier bit by bit as I would need to be up at 5am when school starts. I had holiday projects with the little young man. I cleared the garden. I fell sick. And I had two near-anaphylaxis attacks. But I refused to wallow in depression. I took my anti-histamines and made sure life went on. And whatever methods that did not work, I threw it out of the window and applied a new one. With no self-condemnation that I failed. With no self-kicking or cursing myself that I failed. Because in life, as long as we do not give up, we do not fail even if we fall trying. And I can proudly say today that I tried. I did fall. But I got up again. And at a faster pace this time. And the getting up was much easier. And in all that I did during these six weeks, the little young man was with me. In this persevering journey of mine.

And so as I am writing this, the Joel of today compared to six weeks ago has grown enormously and tremendously. He has become such a confident little boy. He is no longer afraid of of new situations or people like he used to be. And even if he was afraid, he did not show it and he could even stay in that situation for hours, enjoying himself and having fun. He became bold. We no longer have to have a tug of war where going out is concerned. In all those months of depression this year, I became a recluse, hiding like a hermit in the house. And Joel picked up this behavior from me. It was a struggle to bring him out for an outing as he would want to 'stay in the house forever' as he puts it. Yup, he picked up depression from his mother. Going out to the garden was fine. But an outing to the mall, to meet people, was a HUGE struggle. He was petrified of people. He hated to leave the house, which had become his sanctuary, when in fact there was nothing for him to hide from in the first place. Today, he is a totally different person. And I am screaming 'Hallelujah' at this amazing transformation that I see in him.

Like I wrote in one of my previous posts, I am in this race where I constantly have to jump over hurdles after hurdles after hurdles. And at many, many times, I thought I would have crashed into the hurdles and be permanently disabled in my soul as a result of the crash. But it is a miracle that I somehow not only managed to survive but to also have a clean jump. And the more amazing part is that, the little young man at the age of six, managed to clear the hurdles with me and jumps with joy that I had made it through. And it is so rewarding to see him grow as a person although his mother has failed numerous times in so many areas.

So in one week's time, the both of us will be on our new journey. This journey begins in a new year, a new environment, meeting new people, facing new challenges and new adventures. A good friend of mine asked me to whether I am ready for this new phase. Am I ready? Then I asked myself, 'Will I ever be ready?' We can prepare ourselves till the moon becomes blue and until the cows come home and yet we would only know whether we are ready when we are thrown into that situation. And so yes, I have sharpened my sword, strengthened my armour, fed my body, soul, spirit and mind. So yes, hopefully I will be ready for the battles, adventures, journey and to continue on with the perseverance of a lifetime.

So as we move on to a new year, a new phase, let's all persevere on in our lives. Let's move on to greener pastures and to the land of milk and honey. What say you?


33 months ago was:
The Day I Met Death

Sunday 25 December 2011

Home-Made Dumplings and Popiahs and A Very Simple Christmas Dinner

Merry Christmas everybody!

I made a very simple Christmas dinner for my family. I made fried rice, fried bee-hoon (vermicelli) and some mini dumplings and popiahs.

For the dumplings' and popiahs' fillings, I used the fried beehoon and fried rice.

Fried Rice

Ingredients:
1. 3 cups of Basmathi rice
2. Thinly sliced garlic
3. 3 tablespoons of sunflower oil
4. 200g of large prawns (marinated with brown sugar, salt and pepper) (cut into pieces)
5. 200g of minced chicken (marinated with salt and pepper)
5. 250g of french beans (chopped into small pieces)
6. Sea salt
7. Pepper (optional)
-------------------------------------------

1. Pour about 3 tablespoons of sunflower oil into a heated wok and add the thinly sliced garlic.
2. Fry the garlic till slightly browned.
3. Add the minced chicken and fry till almost cooked.
4. Then add the prawns and french beans.
5. Fry till thoroughly cooked.
6. Add the cooked Basmathi rice and season with some salt.
7. Fry till fragrant.

Serve hot.

Fried rice
Fried Beehoon

Ingredients:
1. 500g of organic brown rice bee-hoon (soak in a basin of water until soft)
2. 3 big onions (sliced thinly)
3. 1 garlic clove (sliced thinly)
4. 1 carrot (cut into thin strips) (You can change this to a non-salicylate vegetable if you are not able to tolerate carrots)
5. 4 tablespoons of sunflower oil
6. 100g of minced chicken (marinated with salt and pepper)
7. 200g of large prawns (marinated with brown sugar, salt and pepper) (cut into pieces)
8. Sea salt
9. Pepper (optional)
10. 200ml of boiled water

-------------------------------------------------

1. Pour the 4 tablespoons of sunflower oil into a heated wok and add the garlic and onions.
2. Fry them until slightly browned/fragrant.
3. Add the carrots and continue to fry.
4. Add the minced chicken and fry until 3/4 cooked.
5. Add the prawns and continue to fry.
6. Add the beehoon and continue frying. As you stir-fry the beehoon, add the boiled water a bit at a time and continue frying.
7. Season with some sea salt and pepper and continue to fry until soft.
8. Serve while hot.

Fried beehoon

Dumplings & Popiahs

Ingredients:
1. 300g of all-purpose flour
2. 1/2 cup water
3. 1 teaspoon of sea-salt
4. Oil for deep frying

----------------------------------------

1. Sieve the flour and sea-salt into a large bowl.
2. Add the water a bit at a time while you stir the flour.
3. Mix until the dough becomes smooth. Add more flour if the dough is too wet and sticky. Add more water if the dough is too crumbly and dry.
4. Make about 10 small balls out of the dough.
5. Roll the balls with the rolling pin and make them as flat and thin as possible without tearing.
6. Add the fillings and seal them.
7. Heat the oil in the wok and drop the dumplings and popiahs in when the oil is boiling hot.
8. Fry till golden brown.
9. Place them on a bowl with paper towels.
10. Serve while hot.


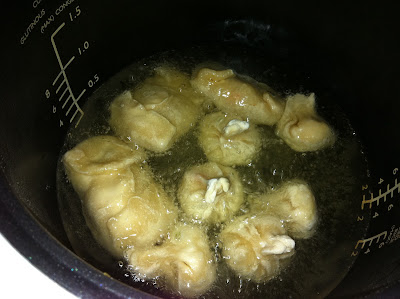
Before frying
1st batch in the boiling oil
Yummy dumplings!
Some of the skins weren't thin enough. They were chewy. The thinner ones were crunchy. Will attempt this dish another time.

Bon appetit!


Friday 23 December 2011

It's All About Buckwheat

I ran out of home-made bread and buns. I was one very hungry person this morning. So I made biscuits, buns and bread today. And I plan to have my bread for breakfast tomorrow with my soya+oats milk! Yummy!

Here is the recipe for the food I made today.

Ingredients:

1. 1 cup of buckwheat flour
2. 1 cup of wholemeal flour
3. 1 cup of high-protein bread flour
4. A pinch of salt
5. 1 tablespoon of dry active yeast
6. A teaspoon of brown sugar
7. A bowl of warm water (400ml)
8. Sunflower oil (1/2 cup)
9. 4 bananas

-------------------------------------------

Buckwheat Biscuits and Buns

1. Mix the brown sugar and warm water until the sugar has dissolved.

2. Add the yeast to the mixture and let it stand until the mixture becomes frothy.

3. Sieve all the 3 flours and salt into a large bowl.

4. Mix the yeast mixture into the flour mixture and start kneading.

5. As you knead, add in the sunflower oil a bit at a time.

6. Take out 1/3 of the (not fully kneaded dough) and place it in another bowl.

7. Continue to knead the remaining dough until it is smooth.

8. Cover the bowl with cling-wrap or a damp towel and let the dough sit for 1 1/2 to 2 hours until it has doubled in size.

9. Divide the dough into half.

10. With the first half, make lots of tiny balls out of it. Then take some flour and roll it between both hands until it resembles a baby snake.


11. You can also make snail shapes too. Just turn the long strands around until it resembles a snail.


12. Place them on baking trays and bake them at 180C for 40 minutes or until crunchy and crispy.

13. When these are in the oven, take the remaining half of the divided dough and make balls the size of a tablespoon. Place them on another baking tray.

 Before baking

Fresh from the oven

14. These are baked at 200C for 25 minutes.

Banana Buckwheat Bread

1. Mash the bananas and add them to the 1/3 dough which was separated into another bowl.

2. Mix the mashed bananas and the dough together and knead it until it is smooth.

3. Pour the mixture into a greased tin or a tin lined with foil.

4. Bake this at 200C for 25 minutes or until browned.


Today's buckwheat baking accomplishments! I will be trying buckwheat pancakes and pasta noodles on another day.


Thursday 22 December 2011

How To Prepare and Cook Home-Made Fish Balls

This post is about how to prepare the fish balls before cooking them.

1. Defrost the fish meat which was prepared and kept in the freezer.

2. Add some all-purpose flour, some sea salt, brown sugar, a dash of pepper and some sunflower oil.

3. Mix all the ingredients together with the fish meat.

4. Shape the fish meat into balls or squares or whatever shape you desire.

5. You can either fry them or boil them.

Bon Appetit!

Step 3
Step 4
Step 5
I fried the fish balls with sliced potatoes and big onions.

If you missed the post on how to make chemical-free home-made fish balls, here's the link:

The Making of Chemical-Free Home-Made Fish Balls


Tuesday 20 December 2011

Home-Made Soya+Oats Milk (...And A No-Rice Day)

It has been 4 hours since I drank my own home-made soya+oats milk and I am fine. Which means I have an additional 'food/drink' to add to the list of food that I can consume! Which means, hip-hip, HOORAY!!!!! :)

It is so good to be able to have something to drink other than cocoa. And I cannot drink cocoa frequently as it gives me a sore throat AND constipation. Once in a BLUE MOON is fine. 

So here is how I made my home-made soya+oats milk. (I only use organic soya beans and oats.)
Soya bean maker
I suggest that you get a soya bean maker. It makes your life easier as the process is not so long and the machine is the one that does all the work. 800ml is the maximum amount of milk that this maker can make. A measuring cup comes with this maker. 50g of soya beans will produce 800ml of rich soya milk. I added 3 tablespoons of oats together with the beans. 

The reason I bought this maker.
After grinding the beans, the maker will 'transfer' the milk into the pot to be boiled.
The milk being boiled.
Do not attempt to boil more than 800ml as the foam will reach to the brim of the pot. It WILL overflow if you try to boil more. I learned it the hard way!
You can keep it in a Thermos flask if you can't finish the whole 800ml at one go!!! I can't! That way, it will still be piping hot and fresh.
You can add some brown sugar to the drink! *Yummy!*
I was too tired to cook today after running some errands. So I made mashed potatoes with sunflower oil, sea salt, pepper and butter. I also made hard-boiled eggs seasoned with salt and sunflower oil. I had two slices of home-made buckwheat bread and some home-made saltine crackers. And my soya+oats milk! Dinner was heavenly! 
Mashed potatoes, hard boiled egg, buckwheat bread and saltine crackers for dinner!

The only thing that I would complain about the soya bean maker is the washing up. It has MANY parts to be taken apart. This maker is definitely NOT for lazy people!


Before I forget, the whole process only takes 20 minutes! *Yay!*


Monday 19 December 2011

The Making of 'Chemical-Free' Fish Balls

The fish balls/cakes that are sold in the markets and supermarkets have all sorts of additives, flavourings, preservatives, and chemicals added to them to lengthen their shelf-life and to enhance the taste. And boric acid is used as a preservative in fish balls too. And sad to say, there is very little fish meat that is used in the fish balls out there.

I have always loved fish balls since I was a child. But because of my medical condition, fish balls/cakes from outside are a thing of the past.

Here is how I make my own fish balls/cakes. And with this, you get 100% fish meat!

This is how the fish look like. Don't just bring the whole thing home. Ask the fish monger to separate the meat from the bone. It will make your job much easier. You can scrape off the meat immediately instead of trying to separate it by yourself. It is a very big hassle.

I usually buy 5 to 6 of this fish and make many packets to be kept in the freezer.

This is how the fish meat looks like after scraping it off from the body.
I use this hand blender to blend/grind up the meat into a paste. Before I discovered this blender, I had to use a spoon and beat and stir until the fish meat turn into a paste. It took about 1/2 hour to 45 minutes!!!! By the time I was done, I had developed triceps and biceps like Hercules! This hand blender makes the job so much easier and faster!
Voila! Fish meat all ready to be kept in the freezer. I divide them to be kept into small bags. 
Fried fish balls!!! *Yums!*
I will share on another post on how to make these fish balls.